Crossdressing Makeup Tips – Video
I had completely forgotten that when YouTube shut down my channel, that no one would be able to watch my TGirl Makeup Instructional Video that I posted on here. Thanks to a comment from Becki who wanted to watch the video, I now have it re-posted directly on TheCrossdresser.org. You won’t be able to stream it any more, but you can download it and view it from your computer at your convenience ![]()
.
7min 20sec runtime, 36MB download

.
This popular xdressing video details everything you need to know to achieve a beautiful and passable look with your makeup. Of course there are many different styles of makeup, so don’t be afraid to experiment! This video just covers the basics to get you started ![]()
Tags: makeup, shaving, video —
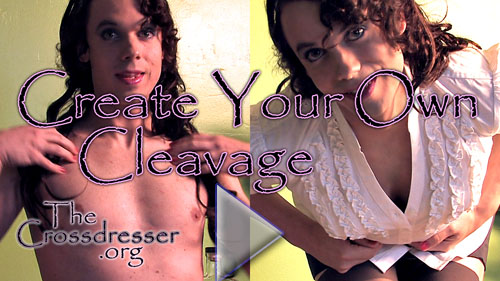
Create Cleavage Video Tutorial
Here’s another video tutorial by popular request – how to create cleavage. This is probably useful for real girls too, but I’m assuming that you’re a crossdresser like me and starting from a completely flat chest . . . and yes, you *can* create realistic cleavage even with no boobs. Speaking of boobs, if you just need boobs under clothing and don’t need to reveal some cleavage, you might be more interested in my breastform tutorials: stuffing, sewing, homemade breastforms, and silicone breast forms.
.
If you’re still reading, I’m assuming you want to show some boob outside of your clothing and will need to know how to create cleavage. It just wouldn’t do to have a breastform of any sort poking out of your clothes afterall. So here’s the cleavage video (you might have to right click and “save target as” just like my last video – sorry, these don’t go over so well on YouTube, so I can’t stream them). Below the video is a written tutorial in case you’re not the video type ![]()
.
Oh, and one last thing . . . I have a *very* flat chest, so there’s only so much I can do to create cleavage no matter how much I try. So just trust me that this can make a pretty dramatic appearance – I bet you’ll be impressed with yourself ![]()
.
4min 44sec run time
55MB download
.
.
Ok, here’s the step-by-step cleavage guide. For the record, the video is probably much easier to follow (this stuff is kind of hard to describe), so I definitely recommend it.
.
-
- Start with a shaved and clean chest. Clean any remaining oils off your skin with some rubbing alcohol.
- Get an ace bandage and wrap it tightly around your torso, a bit above your nipples.
- Pull the front of the ace bandage down, pulling your nipples above the edge – you want to pull any fat and tissue you have available on your chest upwards, using the ace bandage to hold it in place.
- Add some athletic tape on your skin just above the ace bandage (basically over your nipples). The tape strips should be able the length to go from one nipple to the other. Start with a strip on your left side, tape it at the edge of the soft flesh just outside of your nipple, and use it to pull your left breast towards the center of your chest (taping the far end just outside of your right nipple). Then do a strip starting on the right side, using the tape to pull your right breast towards the center of your chest.
- Find a nice tight fitting bra, and put it on so the band helps to hold the ace bandage in place (keep it down below the athletic tape!)
- Add small “enhancer” pads or other stuffing to the bra, keeping these objects on the outside edge of the cup (basically at the start of the band), and to the bottom of the cup. You want this to help hold your new cleavage up without coming anywhere near the upper edge of your cup.
- Enjoy your new cleavage
Tags: breastforms, cleavage, create cleavage, video tutorial —
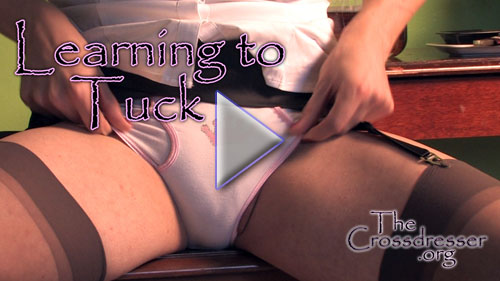
How to Tuck – Instructional Video
I’ve gotten tons of questions lately on my original Eliminating Panty Bulge post asking for more information about tucking. It seems there are a lot of fellow crossdressers who wanted a diagram or video to see exactly how it works. So here it is, the official tucking instructional video ![]() You may have to download this one (right click, save target as) to watch it – unfortunately my YouTube account was shut down for reasons that still aren’t clear to me, so no more streaming video.
You may have to download this one (right click, save target as) to watch it – unfortunately my YouTube account was shut down for reasons that still aren’t clear to me, so no more streaming video.
.
I go in to lots of detail about how to find the hole that will allow your testes to reascend up in to your abdominal cavity, so this video is a wee bit graphic. Don’t say I didn’t warn you! Anyway, I hope this is helpful and answers everyone’s questions about how to tuck to eliminate panty bulge ![]()
.
3min 58sec run time
45MB download
Tags: panty bulge, testes, tucking, video —
Simple Glamour-Shot Photo Lighting for Tgirls
There’s nothing wrong with taking a few photos to post online with your cheap old point-and-shoot digital camera. In fact, a lot of cheap old point-and-shoot cameras can take really amazing photos when they’re used right. And while there’s something to be said for snapshots for the right occasion, if you just went through all the trouble of getting dolled up in your sexiest outfit, nearly killed yourself walking down your stairs in your gorgeous heels, fought with your press-on nails for an hour before realizing that you didn’t put your pantyhose on yet, and agonized in front of the mirror to get your makeup perfect . . . you might as well take 5 minutes to make sure you get a decent photo of yourself ![]()
.
The most important component to any photograph (especially a “portrait”, or really any photo of a person) is the lighting. And it’s the most frequently overlooked. Let’s get this out of the way right now, the built in flash on your camera is not what I mean by lighting. Some built in flashes are pretty decent, but they should still only be used to help fill in light, not as the primary source. And the reason is that you never see a person in normal life lit completely by a bright light shining straight at their face. It’s just not natural – it flattens out all your features, washes out the color in your skin, and just generally makes a mess of that beautiful makeup you spent all that time on.
.
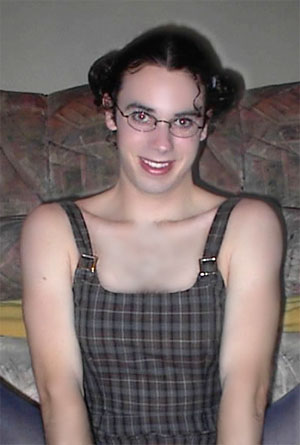
Here’s what happens when you take a good photo (left) and turn on the camera’s built in flash:
 See what I mean? You don’t want to look like a pasty colorless ghost in your photos, you want to look like the glamorous woman of your dreams! Or at least that’s what I’m going for. If you want to be a pasty ghost, read no further!
.
Right, so you’re still with me. I take it that means you want to be glamorous ![]() It’s not that hard, I promise. There are 2-3 important lights in any photo. Sometimes these lights are provided by sources that you wouldn’t expect. Like windows, or even light bouncing off walls (yes, this happens a lot more than you realize!).
It’s not that hard, I promise. There are 2-3 important lights in any photo. Sometimes these lights are provided by sources that you wouldn’t expect. Like windows, or even light bouncing off walls (yes, this happens a lot more than you realize!).
.
So if you only have 1 light (maybe a lamp in the room, or even an overhead light . . . or perhaps a window) you want to position it above the model, in front of the model, and off to one side. This is light 1 in the diagram below. This is always going to be your primary light, no matter how many lights you have. That’s why we pick this as the only light in a pinch. The drawback of using only 1 light is that you will leave the far half of your face in shadow. Let’s see if you can fix this.
.
 Light 2 is a very important light, but it’s easy to sub in a window or a wall if you don’t have an actual light. Light 2 is the second light because it should be less bright than light 1. This is really important. If you can’t control the brightness, move it farther away (which has the same effect). Light 2 is called a fill light because you want it to gently fill in the shadows cast by light 1 without scaring them all away. If you don’t have a second light, find a white wall, hang a white sheet, or put yourself with a window off to the side. The white objects will reflect some of the light from light 1, and trust me, this is often plenty of light for a fill light.
.
Light 3 is called the hair light and is the least important but adds a very glamorous effect. It should be below and behind the model (you!), and preferably bounced off a wall behind you. Use it as if you wanted to light up the wall.
.
Ok, final tip on lighting. Bare bulbs cast really harsh shadows. For a TG especially, harsh shadows are no good. You want to soften your features (without flattening them of course). So put a sheet in front of your lights. Or a lampshade. Or if you really have nothing you can soften the light with, move the lights far away, that also helps.
Tags: camera flash, fill light, glamor shot, glamour photo, hair light, lamp light, lighting, portrait, soften —
Photoshop 101 for TGirls
Here is something I see WAY too much of – a beautiful tgirl who has totally botched a photo of herself by carelessly overusing Photoshop. I personally have no problem with using image editing to remove the occasional flaw, though frankly the flaw is often easier to take care of in real life with a little planning before the photo! Photoshop is an amazingly powerful tool, but while it is very capable of turning you into an airbrushed goddess, it is equally if not more capable of turning you into a corpse or cartoon. So a) use Photoshop correctly, and b) don’t overuse Photoshop.
.
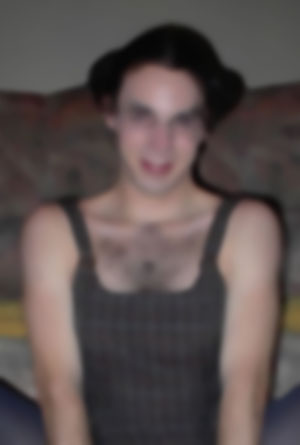
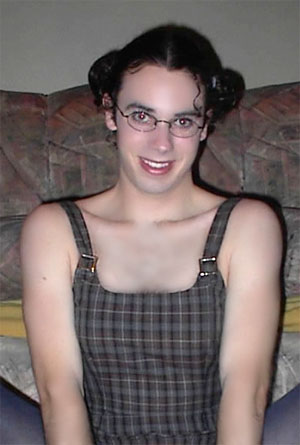
 Ok, Photoshop is a tough program to learn. So here’s a crash course on touching up a photo. I’ve selected a rather old photo of myself from before I started shaving – you know, back when crossdressing was just about feeling the clothes on my body . . . anyway . . . Here I am dolled up, my makeup done . . . but I’m still rather rough looking in the face, and DAMN am I hairy
 ![]()
.
I’ve purposefully selected a difficult photo to work with here – my first recommendation would be to shave or at least hide all that hair! But take a look at the arm hair which is much more manageable, and the roughness of my face. Those items are easy to fix in PS ![]() And while we’re at it, we’ll clean up the dingy colors and get rid of that harsh shadow behind me. How’s that for a start? You’ll notice I did select a photo where I’m happy with my facial expression, my eyes look fairly bright, and I have a nice clean smile. Fixing up those items if you need to will have to wait for another day.
And while we’re at it, we’ll clean up the dingy colors and get rid of that harsh shadow behind me. How’s that for a start? You’ll notice I did select a photo where I’m happy with my facial expression, my eyes look fairly bright, and I have a nice clean smile. Fixing up those items if you need to will have to wait for another day.
.
 Ok first step. Open up your photo, crop it as you see fit, and create a duplicate layer of your image. We’re going to edit this layer and then hide it . . . and reveal it selectively in places that need help.
.
Now on the duplicate layer, apply a “remove dust and scratches” filter. You can also use a “median” filter, though I find dust and scratches works a bit better for hair and spots on the skin. Crank up the radius of the filter higher than you normally would – remember, we’re going to hide this version of the image anyway. You want it to completely take out all of the blemishes you can without totally losing the image.
.
Notice that doing this results in some ugly color edges, sort of like using a posterize filter. Don’t worry, we’ll take care of that in the next step. Also note that I’ve totally distorted the image, but that’s ok . . . obviously if you don’t have as many blemishes to deal with as I do here, it would be better to tone down the filter a bit. But even with this aggressive filter I still haven’t fixed all of my chest hair. We’ll get that later.
.
 Next step is to take care of the funky edges that the dust and scratches filter introduced. Apply a Gaussian blur to the image. Again, you’re going to want to crank up the radius on this filter higher than you normally would. The idea is to smooth out all the transitions and edges that the dust and scratches filter created. Don’t worry about the edges of your image, or the features on your face for that matter
 ![]() They will come back.
They will come back.
.
At this point you should have a relatively clean but dreadfully obscured photo of yourself. Remember, I’ve selected a particularly problematic photo as an example, so hopefully yours doesn’t look QUITE this bad. And don’t worry at this point, it only takes a little practice on these two steps before you start to get a feel for the settings to use. Save your time and effort for the next step ![]()
.
Before we get into step 3, we need to hide all this blurring so we can see straight again. Create a layer mask attached to the duplicate layer and select “hide all”. This will make your entire duplicate layer disappear. So much for all your hard work so far, hmm? Don’t worry, this is where the magic of Photoshop comes in. We’re going to paint in the blurry image where we want to cover a blemish, and keep it hidden where we don’t need it.
.
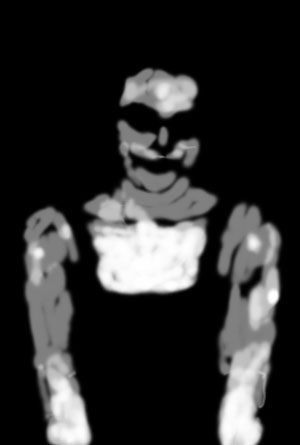 Oh here’s a strange image for you. This is my layer mask – you won’t see this image except in the thumbnail in your layers pallete, but I wanted to show you how I painted in the blurry image. The white spots are where the blurry duplicate image are revealed, and the black spots are where it’s completely invisible. You can see my brush strokes pretty clearly here, but these edges don’t really show up thanks to the fact that I’m just revealing a blurry version of the same image – they naturally blend into the underlying image so you don’t even have to worry about them
 ![]()
.
Ok, to create this mask grab the paintbrush and set your foreground color to white. You’ll want to set the opacity and flow to something around 50% each – this will let the duplicate image show up slowly over a series of strokes rather than right away at 100% wherever you click. If you have a pen tablet, now’s the time to break it out – it will make this step MUCH easier. In fact if you’re using a mouse, you might consider setting the opacity and flow to 20%.
.
Once you’ve got your brush set up, start painting on your skin only! I can’t think of anything other than skin that you’ll want to use this on, as it will completely obliterate textures. Speaking of which, some people recommend adding some random noise to the duplicate layer after all your blurring to match the capability of your camera (all cameras naturally introduce some noise, and if the background has more noise than your face something might look fishy). Personal taste though, I usually don’t add the noise back in. If you want to, try something around 1% though.
.
Don’t paint all of your skin! Remember how the blurry image lacked any definition and all your features disappeared? People have natural lines and edges. We’re 3D afterall. So don’t flatten yourself out. When you get to an edge or a corner or even a dimple that’s supposed to be there, leave it be! Don’t paint over your eyes or your lips, and only touch your nose right along the bridge. For the most obvious example of leaving an edge be, look at the area of this mask where my collar bones are – completely black.
.
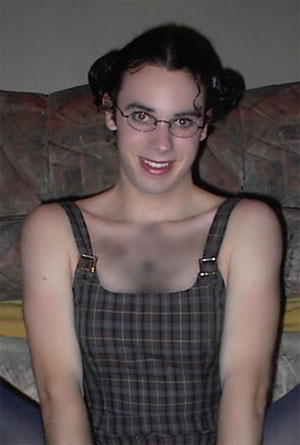 Here’s what your image should look like once you finish your mask. Much better already! Ok, my chest looks like crap still, but check out what the airbrushing did for my arm hair and face
 ![]() Generally speaking, if you have a difficult spot to get rid of, brush perpendicular to the spot (ie across the hairs, not with them). And if you have an edge you want to preserve, brush parallel to it (ie the strokes near my collarbone). A single spot can be taken care of by just tapping the pen or click-click-clicking the mouse a bunch of times – this will progressively make more of the blurry image fill in until the spot is gone.
Generally speaking, if you have a difficult spot to get rid of, brush perpendicular to the spot (ie across the hairs, not with them). And if you have an edge you want to preserve, brush parallel to it (ie the strokes near my collarbone). A single spot can be taken care of by just tapping the pen or click-click-clicking the mouse a bunch of times – this will progressively make more of the blurry image fill in until the spot is gone.
.
Really take your time on the airbrushing part. Change your brush size for different areas, and be very careful when you come up against ridges or lines. Make sure you stop to think if that line should be there or not. You’ll notice that I erased some of the lines around my mouth, but I carefully left a few there as well – if I hadn’t, my face would look really funny. Another good idea is to never ever airbrush hands or feet – these body parts have such a complex surface that even a little airbrushing can completely ruin them. Also take care around any bones that stick out, like around your wrist – these are subtle gradients rather than lines, but they are important for defining your body and you don’t want to erase them.
.
 Time to take care of my ridiculous chest hair. We’ve already tried to blur it away without success, so let’s unselect the layermask and work directly on the blurry image (remember, this image should be almost completely visible in the chest area since we were trying to blur away my chest hair). Instead we are going to dodge it away, so grab the dodge tool and do something you never do with dodge. Set it to dodge shadows. Normally you want to dodge highlights to brighten them, or burn shadows to darken them. In this case I actually want to erase “shadows” by brightening them. Again, set your opacity low to begin with so the dodge occurs gradually.
.
After dodging away at the chest hairs you will eventually get to a nice even tone across the chest, but it will probably be pretty gray-ish. A quick remedy is to select a nearby skintone, add a new (blank) layer on top of the duplicated layer with a blending mode of overlay, and paint in a little color. You’ll want to set the opacity on your brush very very low for this, but just use the paintbrush to color in a little skintone. With a little luck the overlay blend mode will retain the shading of the chest so it still has some shape while adding in some color from the new layer.
.
 Ok, time for a relatively easy step. Flatten your layers from the previous work once you’re satisfied with them. Now it’s time to work on the composite image as a whole. Alternately you could do this step first on the original image, but I always forget
 ![]() The original image here was a bit dark, and the shadows were very sharp. Often if you Auto Tone, Auto Contrast, Auto Color the image (in that order), Photoshop will do a rather nice job for you and you’re done.
The original image here was a bit dark, and the shadows were very sharp. Often if you Auto Tone, Auto Contrast, Auto Color the image (in that order), Photoshop will do a rather nice job for you and you’re done.
.
In this case my image needed a little extra loving attention, so I went into Image->Adjustments->Levels command. I brought the white slider down a good bit to increase the number of white pixels in the image. Then I bumped the black slider up slightly to make sure the shadows in my photo were actually black. And I shifted the medium gray slider (aka the gamma) to lighten the image a bit – this slider reduces the total contrast in the image if you move it from 1.0, so be careful with it. Overall not bad though, hmm?
.
 Ok, the last step! Let’s soften that terrible shadow behind me. Hopefully the shadow won’t be as bad in your images, because I didn’t manage to get rid of the whole thing. But the steps are pretty easy. Grab the Quick Selection Wand and select yourself. Ok, that step might take a few minutes of playing around, but it shouldn’t be too difficult to get a decent selection. Now open the Select->Refine dialog box and feather the selection just a bit. You’ll also want to contract it so that the shadow is definitely outside of the selection. Now copy yourself onto a new layer.
.
Open the blending settings dialog for your new layer, and give it a drop shadow. I know, I already have too much of a drop shadow, but trust me! Now set the shadow color to white and the blending mode to screen, and set the light direction to be opposite of the current shadow – this will cast a white shadow on top of your existing shadow ![]() Play around with the size until you get it right. You can also add an inner glow to clean up any shadowy parts that were inside your selection.
Play around with the size until you get it right. You can also add an inner glow to clean up any shadowy parts that were inside your selection.
.
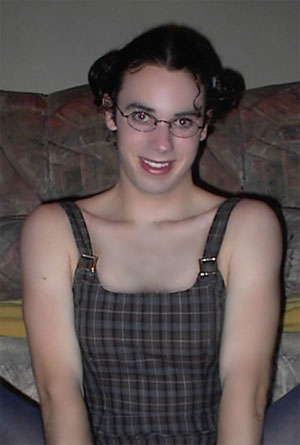
And that’s it! Now you have a properly airbrushed and fixed up image, no matter how bad it looked like to begin with ![]()
Tags: airbrush, fixing photos, glamor photo, image editing, Photoshop, remove chest hair —
Feminize Your Hair
 So you want gorgeous tresses of your own, but need to keep a masculine appearance for work or social reasons? Wigs just not cutting it for you? Don’t worry, there are plenty of ways to feminize your hairdo!
 ![]()
.
Ok, first step though . . . you do have to grow out your hair a little. You don’t need a ponytail, and you don’t have to tell your barber that you want a “girl cut” – a medium length guy’s cut will work just fine. If you don’t believe me about the medium length mens haircut, this is me as a guy. I’m in the process of growing my hair out a bit longer and trying to figure out what to do with it, but the current length and style of my hair is pretty close to this photo. Sure doesn’t look very femme, does it? You’re probably thinking I have to wear a wig all the time, but not true! I have plenty of options with my hair like this ![]()
.
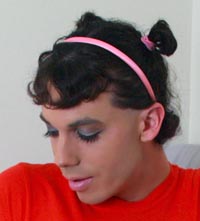 I’ve always had a thing for pigtails, so this is the first thing I learned to do to feminize my hair. Sure, they’re nubby little pigtails at this hair length, but they still give a decidedly feminine look – especially with pink hairties! Because guys haircuts tend to be much shorter in the front than girls haircuts, you probably won’t be able to get all the hair on in the front pulled back into the pigtails . . . which is where the headband comes in. On the upside, most guys haircuts will make for some great bangs, which will make you look young and adorable when crossdressing
 ![]()
.
Ok, so that’s the first femme hair style that most crossdressers try. And as much fun as pigtails are . . . it’s probably not the most feminine look you can achieve with relatively short hair. Don’t get me wrong, I love pigtails and am working on growing out my hair long enough that I can get some decent ones (without losing my day job!). There are just some other styles that work better with shorter hair.
.
 Here’s a style I just figured out today completely by accident. I have a natural center part, and I couldn’t figure out how to get my bangs to look the way I wanted (center parted bangs look ridiculous :p ). So I decided to part my hair on the side, and as I played with it I started to notice that I could straighten out my curls and get a great wave of bangs that almost cover my one eye . . . a very sexy sassy look. That was the easy part though – I still looked like a guy with a crazy combover if I stopped there. The secret to turn this into a femme hairdo is to comb the sides of your hair straight down over your ears. Most guys (and many girls) tuck extra hair behind their ears to keep it out of the way, but you can get a great flipped out bob look by just combing your medium-length guy hair straight down over your ears rather than tucking it back! Sweet
 ![]()
.
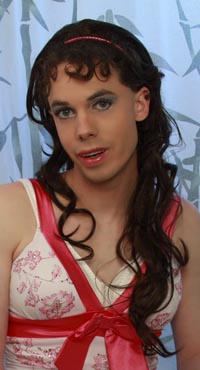 Alright, if short hair just doesn’t do it for your femme side, but you want a secure natural look . . . extensions can be a great option. This photo is my natural hair with a single comb-clip extension – the cheap and easy way to get long hair
 ![]() I think this clip cost me $15. The most important part is that you have to match the hair type and color of the extension to your natural color. Dark browns like mine are of course pretty easy to match, but finding an extension with enough curl was really difficult. Well, until I found this one.
I think this clip cost me $15. The most important part is that you have to match the hair type and color of the extension to your natural color. Dark browns like mine are of course pretty easy to match, but finding an extension with enough curl was really difficult. Well, until I found this one.
.
A word of warning though, a single comb like this will typically only work for a down-do. If you try to put it into a ponytail, pigtails, or anything else its attachment point will become very obvious. Multi-piece extensions will work much better for styling, but are typically more expensive and more work. And personally, my multi-piece extensions just look way too thin in my thick curly hair – I’d need 100 pieces to make it work! On well, such is the life of a crossdresser ![]()
.
Hope you found these crossdressing hair style tips useful. I’m always looking for new things to do with my hair, and I’m certainly not an expert yet . . . so if you have any other ideas I’d really love to hear about them! Actually, I will probably be getting my hair trimmed up this weekend – any ideas what I should ask my barber for?
Tags: extensions, femme hair, hair style, hairdo, natural hair —
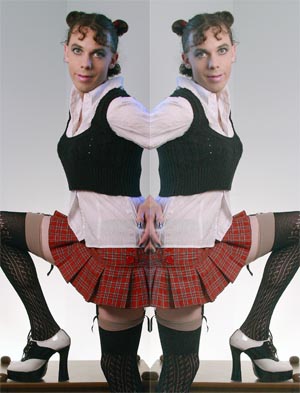
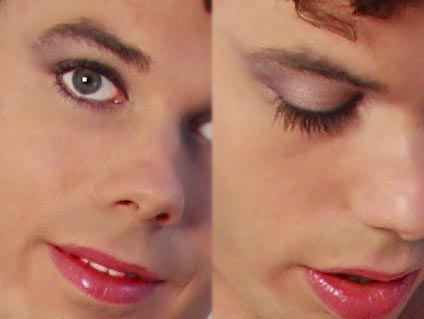
Innocent Eye Makeup
 Here’s a great new eye makeup style that I learned about which creates a very subtle and innocent look. I tried it out for the first time today, and I’m pretty happy with the results
 ![]() There are two major lessons here that I will probably apply to other styles as well. First is applying a horizontal gradient across the eyelid . . . previously I had always used a vertical gradient (ie from lashes up to eyebrow) because it seems “natural”, but it turns out that a horizontal gradient (ie from nose outwards) does a great job of softening shadows that fall on your face – perfect for that “innocent” look, and also great for generally making you look younger. Second is using a similar technique for eyeliner on the bottom lid. I’d always had a hard time with eyeliner looking too dark on my lower lid, but if I didn’t add any at all then my eye lacked definition. Believe it or not, creating a horizontal gradient with your eyeliner is also a great makeup trick!
There are two major lessons here that I will probably apply to other styles as well. First is applying a horizontal gradient across the eyelid . . . previously I had always used a vertical gradient (ie from lashes up to eyebrow) because it seems “natural”, but it turns out that a horizontal gradient (ie from nose outwards) does a great job of softening shadows that fall on your face – perfect for that “innocent” look, and also great for generally making you look younger. Second is using a similar technique for eyeliner on the bottom lid. I’d always had a hard time with eyeliner looking too dark on my lower lid, but if I didn’t add any at all then my eye lacked definition. Believe it or not, creating a horizontal gradient with your eyeliner is also a great makeup trick!
.
Step 1:
 Ok, first step is to apply a base layer of the lightest color you will be using. Always start light and layer on darker colors, regardless of which direction your gradient goes. If you do it the other way around, you will have a hard time with smudges and streaks. To get a nice innocent look, I started with a base layer of white eyeshadow and filled my entire upper lid from lash to brow. I also added a streak of white on my lower lid. Be careful adding light colors on your lower lid though, because whites and silvers have a tendency to accentuate wrinkles (and most people have some wrinkles under their eyes even when they are relatively young). If you can’t pull off white or silver, try a brown that’s lighter than your skin tone.
.
Step 2:
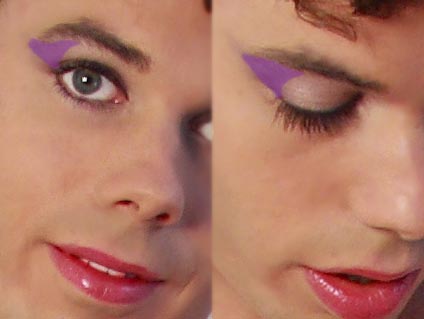 Next step is to add the gradient. Select a darker color (purples or blues work great for this) and “dab” it into your eyelid on the outer edge. This keeps the lighter color towards your nose where shadows tend to form, thus counteracting the shadows and softening your face. Anyway, dab away, but don’t blend or smudge – you’ll end up with way too much color and the darker shade will just go everywhere. Dab dab dab. You don’t need much eyeshadow for this. Also follow the line of your eye *up* your cheek a bit – this will elongate your eye a bit, but make sure you go up your face so you don’t make your eyes look droopy!
.
Step 3:
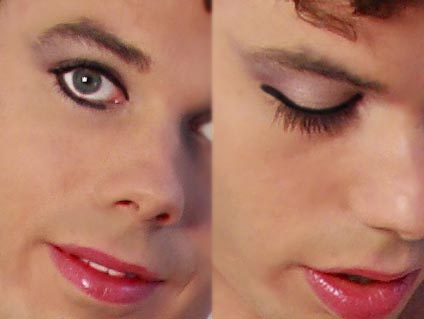 I’m going to break my own advice here on step 3, and I don’t have a good justification for it. Just trust me :p Ok, grab your black eyeliner (or black eyeshadow with a thin tight brush) and trace your upper lash line like you normally would. You want a nice thin line because most of your eyelid is a very light color that you don’t want to overwhelm. Work from the inside edge outwards, and be sure to pull your skin taught. to keep the line crisp. Now on to your bottom lid, start from the *outside* edge and work your way about 3/4 the way across your eye. No further, just 3/4 the way across!
.
Step 4:
 Ok, now grab a bright white eyeshadow, preferably brighter than what you coated your eye with. Using a small tight brush, start from the inside edge of your lower eyelid and pull a single thin line of white out towards where you stopped with the black eyeliner. You’ll want to go about halfway across your eye (overlapping the black), but allow the white to fade out into the black eyeliner where they overlap. This should create a nice gradient that brightens up the lower inside corner of your eye. It will make you look more awake and perky
 ![]()
.
That’s all there is to it! Now you have perfect eyes for a schoolgirl outfit, wedding, or any other innocent look.
Tags: eye makeup, eyeliner, eyeshadow, gradient, innocent, schoolgirl, wedding, white eyeshadow —
Wigs – Synthetic or Natural
Most crossdressers require a wig. Only the very fortunate of us can afford to keep our hair long . . . and even then there is the threat of a job interview or new significant other, etc that would necessitate chopping off those gorgeous locks. So before that day comes, you might as well be prepared with a wig. And who knows, you might find that the wig suits you better than your own hair!
.
Once upon a time I had long hair myself. And I will tell you, the one thing a wig can never replace is the confident secure feel of your own hair. But a wig can let you change your hair length or color whenever your heart desires. I think those are the primary tradeoffs.
.
Ok, so if you’re looking into a wig at this point there are two things to consider: natural or synthetic, and full wig or extensions. If you have moderately long hair, you might want to look into extensions. You can find clip in extensions made of natural hair that will look incredibly realistic for cheap. They take a bit more skill to apply, and they can be a bit awkward to style in some cases (especially if you want pigtails or something of the sort). Generally speaking they work best for straight hair, and if you have a lot of volume in your natural hair they will look a bit stringy and thin. So let’s assume for the moment that you’ve decided to go with a full wig. More on extensions some other time.
.
Natural hair wigs provide the ultimate in realistic look and feel and can be styled to your heart’s content. They last longer than synthetic wigs, and will not get split and frazzled at the ends nearly as much. That said, natural hair also requires a lot more care and is ~10x as expensive. If you’re going to buy a natural hair wig, expect to invest some time keeping it nice (just like you would your own hair), expect to go to a salon to have it styled the first time (they usually do not come pre-cut and styled), and expect to own only one. Natural hair wigs typically cost several hundred dollars or more.
.
A comparable synthetic wig can be picked up for $30-$100 (just don’t buy cheap costume wigs as they never look realistic and the fibers break quickly) and will last you several years if you treat it well. If you use and abuse it (like I do for my website), or wear it frequently (daily), plan on replacing it every year. Even with yearly replacement though, synthetic wigs will work out to be cheaper than a natural hair wig. Don’t get a synthetic expecting it to last forever though – synthetic hair pieces wear out, especially with aggressive brushing or styling. Synthetic wigs also come pre-styled . . . which can be both a blessing and a curse. You don’t have to worry about cutting them or going to a salon (you can wear a synthetic hair piece “out of the box”), but if you try to style it too much you will likely be frustrated – synthetic fibers are stiffer than natural hair and start to look like plastic (that’s what they’re made of afterall) if you pull them too far out of their preferred alignment.
.
All said, I would start with a synthetic wig. Try it out, wear it a few times. Remember that you can afford to buy a few of them for the price of a natural hair wig. And if at the end of the day you decide that you really need that extra realism, then go for the natural hair . . . just make sure you know what style you want before you shell out that kind of cash!
Tags: costume wigs, hair, natural hair, styling, synthetic fiber, wig —
Tgirl Makeup Instructional Video
Edit 4/28/12: YouTube shut down my channel ![]() But the good news is that I just reposted the video today – check out my updated post.
But the good news is that I just reposted the video today – check out my updated post.
.
Just uploaded, check out my new YouTube video: Makeup for Crossdressers. This instructional video goes through the how-to steps of tgirl makeup from shaving through finishing touches in high def detail. I know I’ve posted before on individual makeup tips, but I thought this video might be really helpful for any visual learners out there ![]()
.
If nothing else, it’s worth taking a look at the before and after photo below to see what a difference some well-applied makeup can make. And let me tell you, I’m not a professional makeup artist, this is stuff that anyone can do at home!
.

Crossdresser Makeup Before and After
Tags: before and after, eyeshadow, how-to, lipstick, makeup, video —
Eliminating Panty Bulge
At some point in time, most crossdressers will be faced with this problem – an unsightly bulge in their panties that they just can’t hide. There are many types of outerwear that eliminate the problem without any effort, but what if you want to wear that sexy mini skirt or those really tight jeans? Well don’t worry, there is a tried and true method of tucking that will eliminate all your panty bulge concerns.
.
If you’ve ever tried tucking just your penis between your legs to hide the bulge, you’ve probably been quickly confronted with the issue of what to do with your testes. They’re much bigger than you realized, aren’t they? And there’s really no comfortable place to move them out of the way. Luckily, for most crossdressers there is an amazingly convenient solution – all you have to do is tuck your testicles back where they were before you were born.
.
When you were born your testes were hidden safely away inside your abdominal cavity, and at some point they descended into scrotum (which is literally just a pouch of skin that holds the testes – it’s not really attached to them). They descended because sperm cells develop best at a temperature lower than body temperature. But otherwise there is no reason the testes can’t be slipped back up inside the abdomen temporarily. If you do this regularly for long periods of time, the only documented side effect is temporary sterility until your body has a chance to produce a new batch of sperm at a more optimal temperature. Don’t count on this for birth control!
.
So you’re ready to try tucking for the first time? Ok, relax, lay down, and spread your legs. This will ensure the opening between your scrotum and abdominal cavity is as wide as possible. As you gain practice, you’ll likely be able to do this without any effort though. Now feel around a little to learn where the opening is. If you press your fingers gently at the base of your scrotum (“under” your penis and a little to the side) you will probably be able to feel the opening into your abdominal cavity. You may even be able to press a finger into it a good ways (obviously it’s covered by skin though, so it’s just an internal hole). You should also be able to pinch the skin of your scrotum above your testes and find what will feel like a little tube. This is your vas deferens, and you can follow that tube up to where it enters your abdomen through the same hole.
.
Ok, now that you know where your testicles will be going, press the fingers of one hand against one of your testes and align it with the hole into your abdomen on the same side. Keep your fingers flat so that you are distributing pressure evenly across your entire testis and press it gently through the hole. It will likely deform a little in the process, but pop right back into shape once it’s through. No big deal. Now close that leg towards your body (this will help close off your abdominal hole on that side of your body) and open your other leg to do the other side.
.
Once you have tucked your testes safely inside your abdomen, you will probably be able to feel the slight bulges of them above your pubis (the lower bone of your pelvis that crosses just above your penis). Now to keep everything in place, pull your penis tightly back between your legs. With a little luck this will work like a lid of sorts, closing off half of each hole into your abdomen – sufficient to keep your testicles inside.
.
Now to hold your penis in place. I really really don’t recommend using tape. It can hurt quite a bit coming off. Duct tape for example sticks to skin astonishingly well after an hour or so and will be quite painful. Instead, just try a tight article of clothing with some spandex in it. One of my personal favorites is a good pair of pantyhose (again, go for a pair with lots of lycra / spandex). Or find some nice tight panties with a wide crotch like boyshorts, or try a gaff – a wide crotched thong made for crossdressers.
.
In any event you should be quite comfortable now and have a nice smooth femme panty line. And when it comes time to let the boys back down, just untuck your penis and press gently against your testes where you can feel them bulging above your pubis. They should pop right back out and be good as new ![]()
Tags: gaff, panty bulge, testes, tucking —